
How to Route and Hide Seasonal String Lights in Compact Rooms

The first time I tried hanging twinkle lights in a tiny studio, I made the classic mistake: I started at the outlet and just… wandered. By the time I reached the far corner, the cord was swooping like a bad haircut, I had three uneven loops of slack, and the whole room felt smaller because my eyes kept snagging on the mess.
In compact rooms, string lights can be magical, but only if the hardware side stays quiet. By hardware, I mean the cords, plugs, connectors, and little controller boxes. The goal is simple: one clean line, predictable turns, and a power path that disappears into the room’s edges.
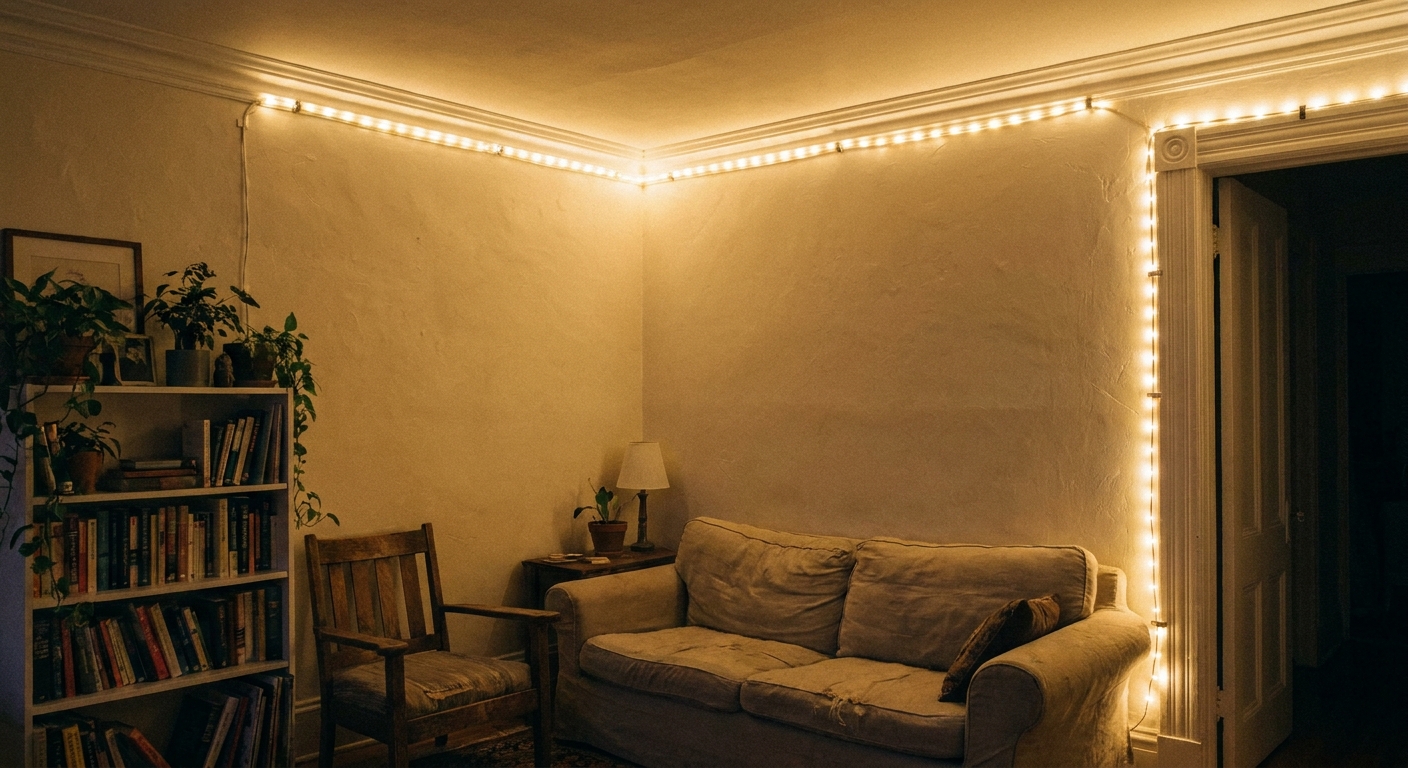
The small-room rule: route first, hang second
If you do one thing differently this year, do this: decide the route before you attach a single clip. In small spaces, improvising almost always creates extra visual noise.
Pick your perimeter
- Ceiling line (most spacious-looking): draws the eye up and makes walls feel taller.
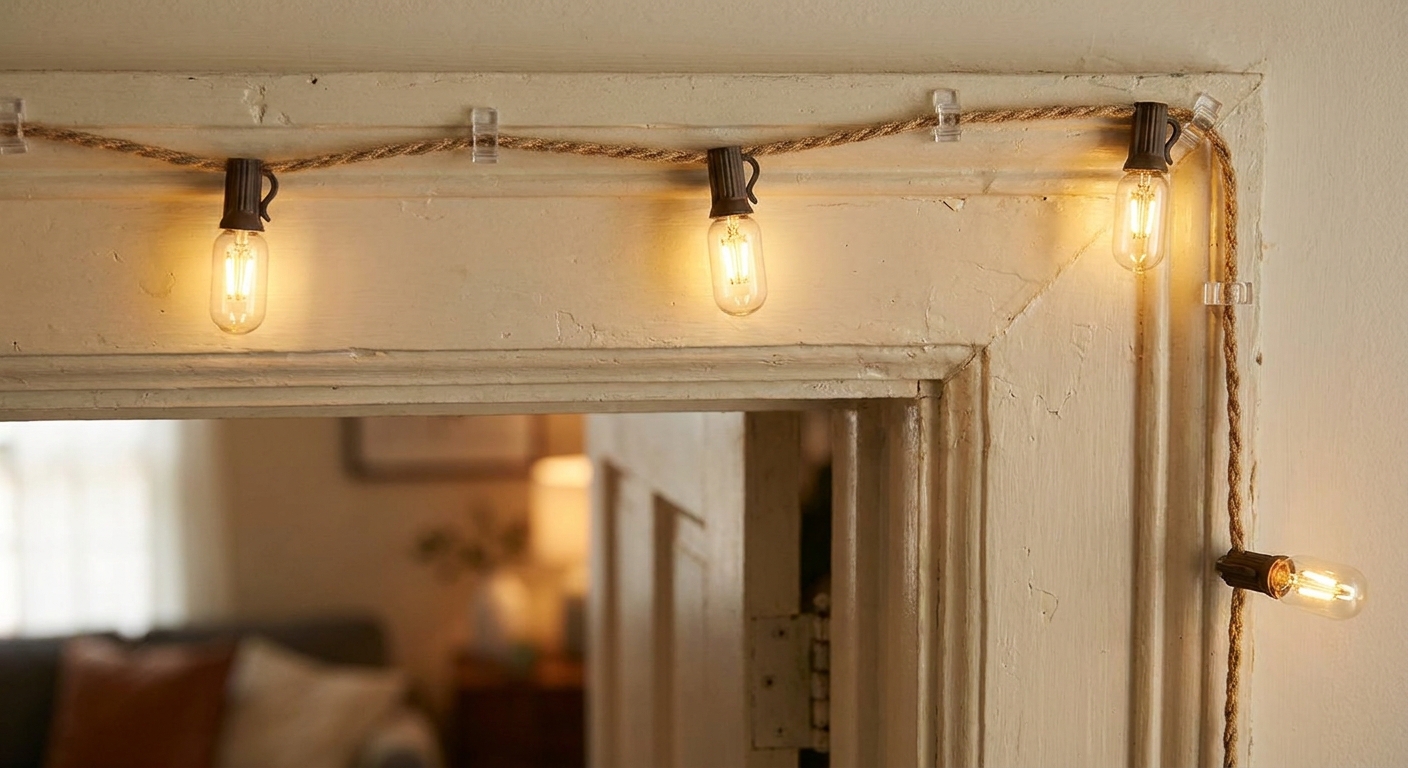
- Door frame (most forgiving): lots of natural edges to hide clips and cord transitions.
- Window frame (coziest at night): best when you can hide the cord behind curtains or blinds.
- One feature zone (cleanest): a headboard, a bookshelf outline, or a single corner vignette instead of the whole room.
If your room already feels busy, a single-zone installation often looks more intentional than outlining every edge.
For other tiny-home seasonal ideas that keep visual clutter low, I also love the approaches in holiday window decor ideas for tiny homes and minimalist holiday table settings for small tables.
Tools that keep lights tidy (and removable)
You do not need fancy gear, but you do need the right kind of attach points for your surfaces and your patience level.
My go-to supplies
- Clear adhesive light clips for walls, door trim, and sealed, smooth surfaces.
- Painter’s tape for testing the route before committing to clips.
- Mini zip ties or twist ties to bundle slack behind furniture.
- Cord covers (paintable raceways) when you must cross open wall space.
- One extension cord in a matching color to your wall or trim, if needed.
A quick reality check on adhesive: even “smooth painted surfaces” can be unpredictable. Matte paint, fresh paint, dusty trim, and older paint that lifts easily can all cause clips to fail or peel. I always test one clip in an inconspicuous spot and follow the manufacturer’s directions and time limits.
Important safety note: use indoor-rated LED string lights indoors, keep cords away from heat sources, and avoid running extension cords under rugs or carpet. That can trap heat, damage the cord over time, and create a fire or trip hazard. Also skip daisy-chaining extension cords or power strips. If you need more reach, use a single properly rated extension cord and keep connections accessible.
Step-by-step: a clean ceiling-line install
This is my favorite layout for small rooms because it reads like soft architecture instead of stuff on the wall.
1) Start at the least visible outlet
Look for the outlet that is naturally hidden by a sofa, console, or curtain. If the only outlet is in a high-traffic spot, plan to drop the cord behind furniture as quickly as possible, then go up the corner to the ceiling line.
2) Create a vertical spine in a corner
Instead of letting the cord travel diagonally across open wall space, send it straight up a corner. Corners visually camouflage cords because your eye expects a line change there.
Clip spacing: start with clips about every 12 to 18 inches on the vertical run, then tighten the spacing anywhere the cord wants to bow outward (especially near plugs and corners).
3) Run the lights along the ceiling edge
Keep the strand as close to the ceiling as you can without fighting crown molding or textured ceilings. The tighter the line, the calmer it looks.
4) Make corners crisp
At each corner, do a small controlled bend and place a clip just before and just after the turn. This stops the strand from rounding the corner and sagging.
5) Hide extra length on the return wall
Most strands are not a perfect match for your room. The trick is to hide extra length where it reads like design, not math.
- Best places to lose slack: behind a curtain panel, behind a tall plant, along the back edge of a bookshelf, or on the wall behind the headboard.
- Worst place: above your bed or sofa where the sag becomes the focal point.
Quick ceiling-line checklist
- Choose the route first, then hang.
- Get to a corner fast, then go straight up.
- Keep the line tight to the ceiling edge.
- Clip before and after every corner.
- Hide slack on a low-visibility wall or behind something tall.
How to wrap door frames neatly
Door frames are basically built-in cord-hiding lanes. The key is to keep the plug and any controller box from floating in midair.
Route plan that looks intentional
- Bring power to the hinge side if possible. It is visually quieter.
- Run up the door trim using small, evenly spaced clips.
- Across the top trim with a clip near each corner.
- Stop cleanly rather than looping down the latch side unless you truly want a full outline.
If your light set has a small control box, tuck it behind the door casing or just above the top corner on the hinge side, then secure it so it does not dangle.
Textured walls and tricky surfaces
If your walls are textured, brick, or very matte, adhesive clips can be hit-or-miss. I focus on routing that uses existing edges and furniture so I do not have to fight the wall.
- Use trim and ledges: follow window casing, door casing, baseboards, or crown molding where clips can grip better.
- Go ceiling seam to corner: the wall-to-ceiling seam often gives you a cleaner line than the middle of a textured wall.
- Use a freestanding edge: run the vertical drop behind a bookcase, wardrobe, or curtain panel, then hop to the ceiling line.
- Use a cord cover when crossing open space: if you must cross a flat, visible section, a paintable cord cover is usually cleaner than trying to force clips to stick.
Where cords get messy (and how to fix it fast)
Problem: the cord swoops away from the wall
- Fix: add more clips on the problem stretch, especially right after corners or near the plug. Gravity needs frequent support in small rooms.
- Fix: rotate the strand so the heavier wire side sits against the wall.
Problem: you can see the power drop
- Fix: run the drop behind a curtain panel, a tall bookcase, or the side of a wardrobe.
- Fix: use a paintable cord cover for the last visible 2 to 4 feet.
Problem: too much extra length at the end
- Fix: do a tight backtrack along the same ceiling line for one short section so it reads like a brighter cluster, then stop.
- Fix: coil the final 12 to 24 inches behind a piece of furniture and secure with a twist tie.
Smart hiding spots in compact rooms
In small spaces, the best hiding spots are already doing visual work.
- Behind curtains: route cords on the side that stacks when the curtains are open.
- On top of tall cabinets: keep the line at the back edge so you only see glow, not wire.
- Along peg rails or hooks: a peg rail can double as a tidy routing line for seasonal decor.
- Behind-the-door zone: if you need a place to manage cords and controllers, the back of a door is surprisingly helpful. See behind-the-door organization ideas.
If you love the peg-rail look for small homes, install a Shaker peg rail is one of my favorite weekend upgrades because it quietly solves a lot of “where does this go?” problems.
Renter-friendly hanging without wall damage
Most compact-room light setups fail because people are afraid to commit, so they use too few attachment points. You can still do a secure install without holes.
- Test first: map the route with painter’s tape for one evening. Sit on your sofa and look for droops and awkward dips.
- Clean surfaces: wipe trim and walls so adhesive actually sticks.
- Avoid fresh paint: if a wall was recently painted, wait until it is fully cured before using adhesives, or stick to trim and freestanding routes.
- Remove gently: when it is time to take lights down, pull adhesive tabs slowly and parallel to the wall. If a clip feels stuck, warming it slightly with your hand first can help it release more cleanly.
If you are also hanging seasonal wreaths and want the same no-damage mindset, hang seasonal wreaths indoors without wall damage pairs beautifully with twinkle lights in a small entry or hallway.
Make it look calm: spacing tips
The smaller the room, the more your eyes crave order. These are the little details that make string lights feel styled instead of scattered.
- Pick one light temperature per room. Warm white is usually the easiest on the eyes at night.
- Aim for symmetry where possible: match the left and right corners of a door frame, or keep a consistent distance from the ceiling line.
- Keep strands off busy walls: if a wall already has art, shelves, or a gallery, outlining it can feel like too many lines at once. If you want a clean gallery approach, I love the ideas in a minimalist gallery wall for a narrow hallway.
- Hide controllers and connectors: blinking modes are fun, but the little button boxes and dangling joins are what scream temporary. Tape and tuck them where they will not swing.
Quick layouts for real small rooms
Studio apartment
- Run lights along the ceiling above the living zone only, then stop at the natural division where your bed area begins.
- Drop power behind a bookcase or curtain near the outlet.
Tiny bedroom
- Route from outlet behind the nightstand, up the corner, across above the headboard wall only.
- Hide extra length behind the headboard or along the back edge of a dresser.
Narrow hallway
- Outline just one side of the ceiling line to avoid tunnel vibes.
- Use a clean vertical drop at the end closest to the outlet.
Small living room with a door you use constantly
- Skip wrapping the door. Run ceiling-line lights and stop before the doorway.
- Keep the busy zone high, so your eye is drawn up and away from foot traffic.
After the season: store lights without knots
Future-you deserves better than a tangled ball of wire in a random tote. I store lights the same way I try to store everything in a busy home: contained, labeled, and easy to grab.
- Wrap strands on a piece of cardboard (a simple rectangle works) and secure the plug end with a twist tie.
- Bag by room so next year is a one-step setup.
- Keep them clean and dry in a lidded bin if you are storing for months.
If closet space is tight, you might also like my approach in store bulky holiday decor with zero closet space.
FAQ
How do I hide string light cords on a wall with no trim?
Use the room’s natural edges: up a corner, along the ceiling seam, then down behind furniture. If you must cross open wall space, a paintable cord cover is the cleanest option.
Should I outline the whole ceiling in a small room?
Only if the room is visually simple. In most compact rooms, one or two walls looks calmer and more intentional than a full perimeter.
What is the fastest way to make sagging lights look better?
Add clips. One extra clip placed right after a corner or mid-span usually fixes the droop that makes a room feel messy.